


We have all been there: sitting alone with a microphone, narrating slide after slide, wondering whether our students feel a connection to the person behind the screen. In online pedagogy, research tells us that social factors such as instructor presence are a key driver of student engagement (Gunawardena & Zittle, 1997; Mayer, 2014; Mayer, & DaPra, 2012, Richardson, & Swan, 2003). But the logistical hurdles—lighting, cameras, and the sheer time required for high-quality video production—often keep us hidden.
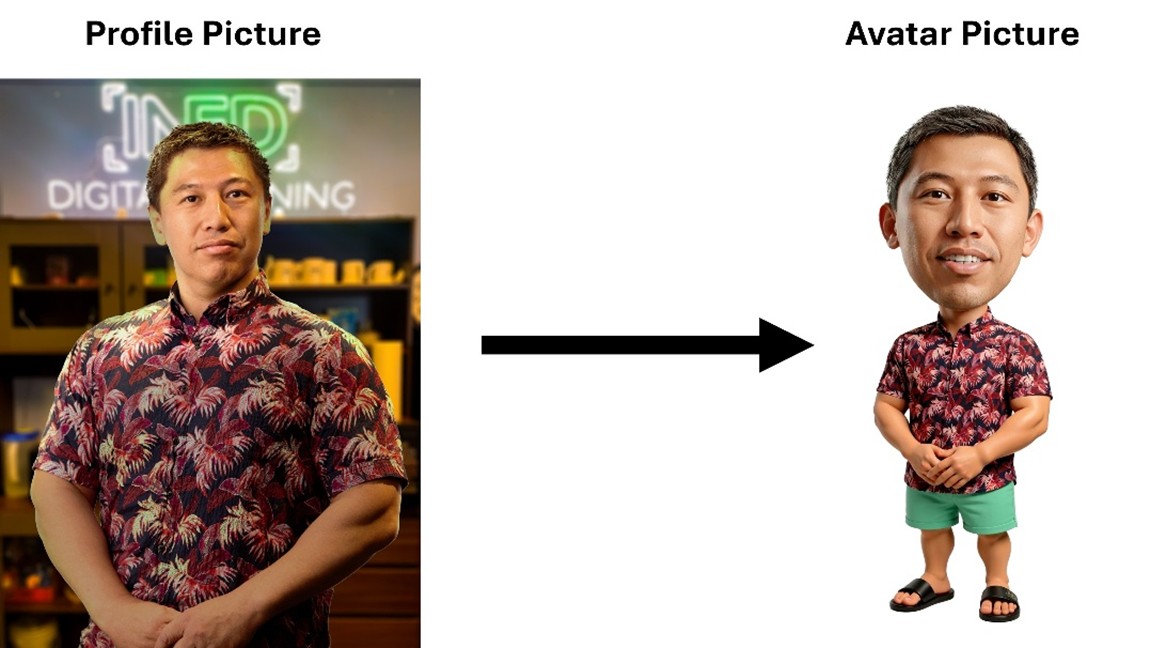
This is where a stylized AI avatar offers a powerful middle ground. By using a personalized, animated character to introduce your lectures, you can build a human connection and establish social presence without the hassle of a traditional camera setup. Here is a rapid, five-step workflow to add a touch of “design magic” to your online courses. This workflow transforms a plain video opening to a more personal one, as below.

Step 1: Generate your avatar image
The first step is to transform your profile picture into a stylized avatar that resembles you.
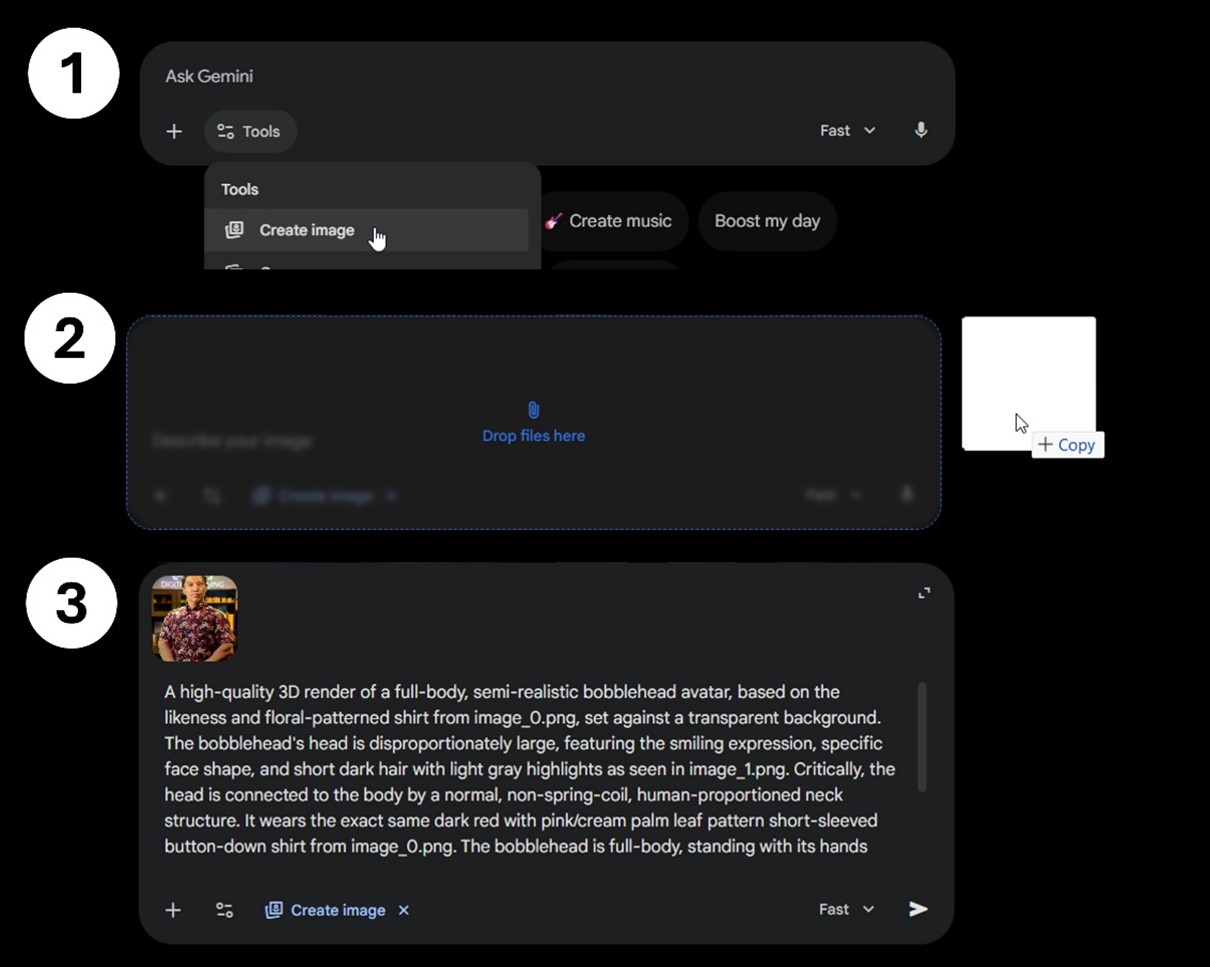
Using AI platforms like Gemini, ChatGPT, and Copilot, you can generate an image that resembles you but remains clearly an illustration. If you are using Gemini, select the “Create image” option in the chat box (①), upload your profile picture by dropping it into the chat box (②), and enter a prompt text in the chat box (③), explaining how the AI should convert the uploaded picture to an avatar image.
When the AI finishes generating your avatar image, you can download it by clicking the download icon.

The benefit: Choosing a nonrealistic, stylized character ensures ethical transparency and avoids the uncanny valley effect.
Step 2: Generate a looping base video
To make the avatar “live” throughout a speech, you first need a short, looping video of the character blinking and subtly moving. You can create one by using an animation tool like Google Flow or Kling. See below for the steps using Google Flow.
- Open the Google Flow page and click the “+ New project” link to open a workspace.
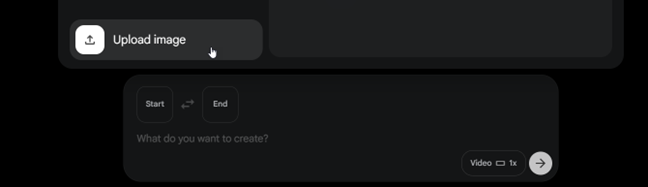
- Upload your avatar image as both the start and end frames by clicking on the Start and End boxes and then “Upload image”.
Now you have both the start and end images uploaded.
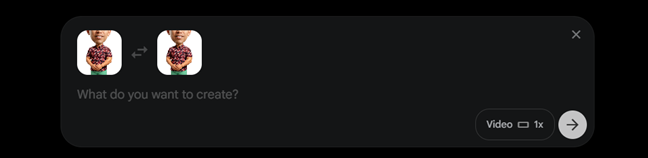
- Enter a prompt text in the chat box, explaining how the AI should convert the uploaded picture to an avatar video, and click the arrow button to begin generating.
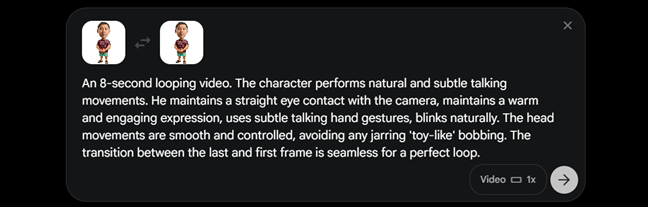
- When it finishes processing, you can view the finished video and download it.
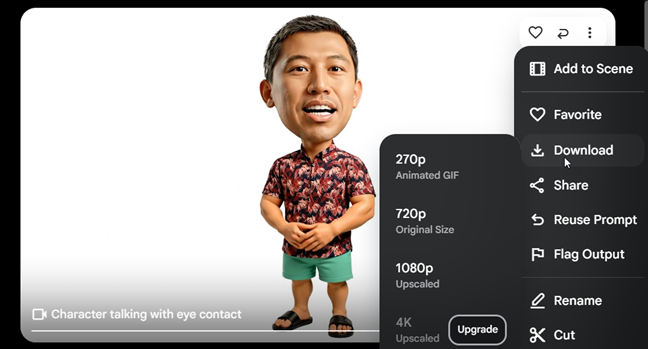
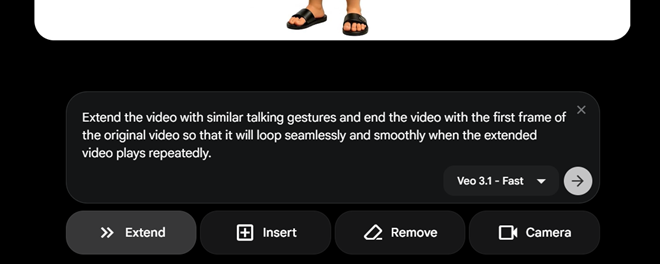
Optional: Google Flow generates up to eight seconds of video at a time. An eight-second looping avatar video works for our purpose, but if you want to make a longer looping video, Google Flow allows you to extend the video by selecting Extend and telling the AI to make the first and end frames identical in the prompt.
Step 3: Lip-sync with your lecture audio
Now you will give your avatar your voice. I used DreamFace because it can handle longer audio segments affordably compared to other tools, such as Kling, HeyGen, Sync.so, OpenArt, and ElevenLabs.
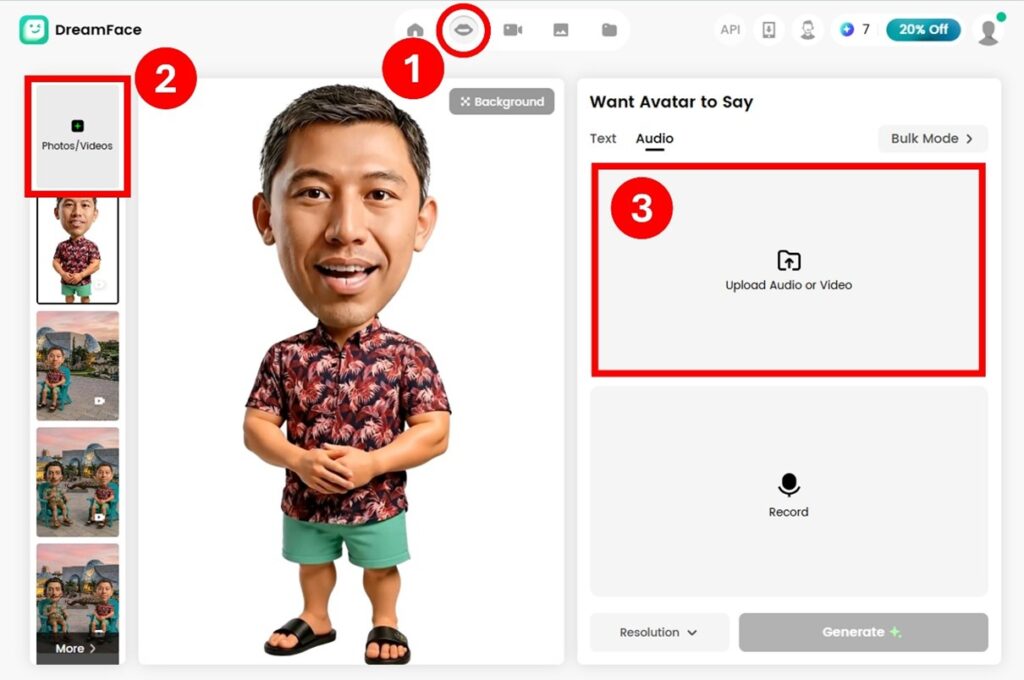
- Log in to your account and open the Avatar Video tab (①).
- Click Photos/Videos to upload your looping avatar video (②).
- Click Upload Audio or Video to upload your lecture video (③).
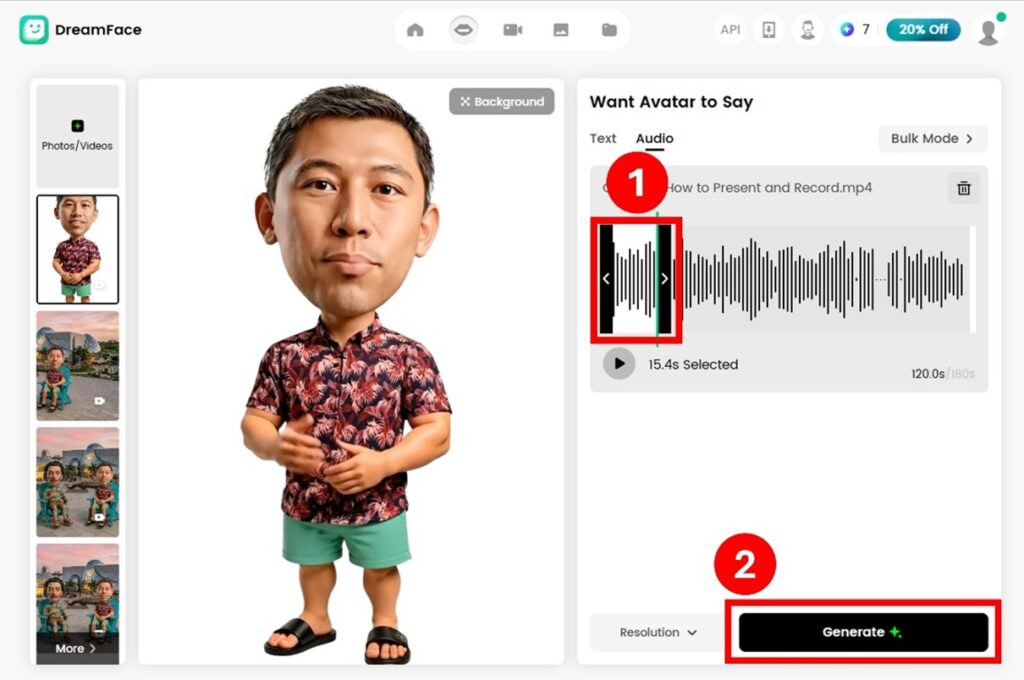
- The Audio tab now shows the video’s audio. Select the specific portion of the audio—perhaps the first 30 seconds where you introduce the video (①)— then click Generate to start generating a lip-synced avatar video (②). The AI will now map your speech patterns onto the avatar’s mouth movements.
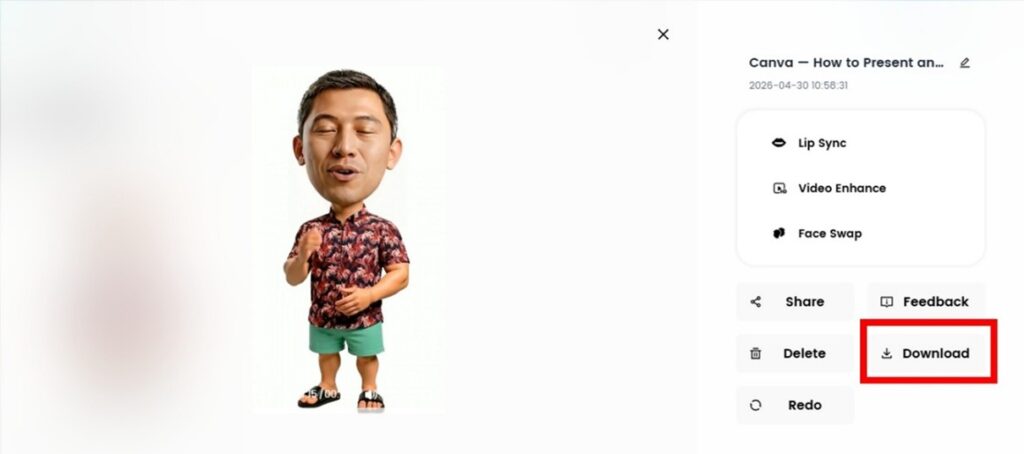
- Within a few minutes, you have a video of your avatar “speaking” the selected speech audio segment. Click Download to download the video.
Step 4: Layer and refine in your editor
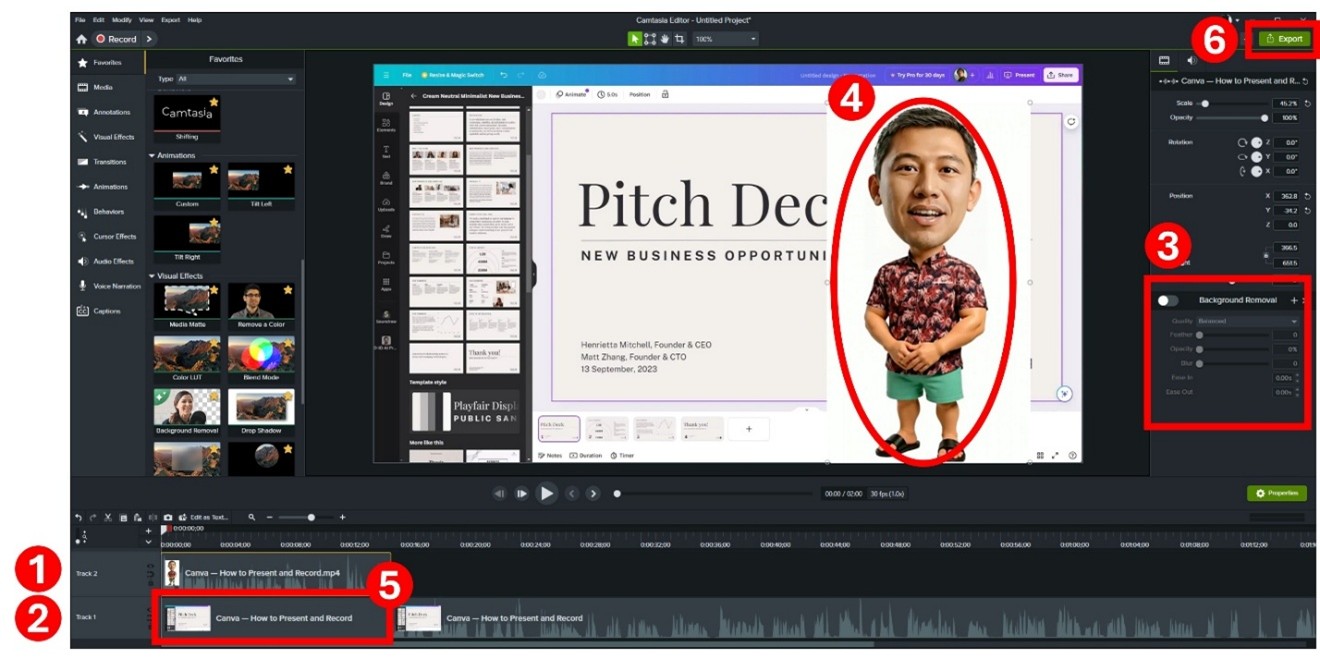
Once you have your lip-synced video clip, bring it into a standard video editor like Camtasia, as in this example, to finalize the presentation. The final step is to layer the generated talking avatar clip over your original lecture video clip, which involves following tasks.
- Layering: Place the avatar clip on the top track (①), and your lecture clip on the track below (②).
- Background removal: Use Background Removal or Remove a Color (③) to make the area around your avatar transparent, allowing your lecture clip to show through.
- Position the avatar: Position and resize the avatar appropriately (④).
- Mute the redundant audio: Mute the segment of the lecture clip that overlaps with the avatar clip to avoid echoes (⑤) as your new avatar clip already contains the identical speech.
- Export the video: Use the export option to create a new lecture video with your talking avatar (⑥).
Implications
What’s great about this workflow is its reusability. Your base looping avatar clip only needs to be created once. For every subsequent lecture, you simply need to run the lip-sync step (step 3), which typically takes less than five minutes.
This isn’t just about using a trendy tool; it’s about reducing the affective filter of student anxiety. By shifting from a faceless voiceover to an introductory avatar, you signal to your students that there is a real person invested in their success (Richardson & Swan).
A note on transparency
While generative AI can create photorealistic deepfakes, using a stylized, nonrealistic avatar is often effective in an educational context. It maintains a clear boundary between the virtual and the real, ensuring that students appreciate the personal touch without questioning the authenticity of the medium. As instructors, our goal is to enhance connection, not to deceive; a stylized avatar achieves this with design magic” and total clarity.
In a landscape of automated content, a personal touch—even a virtual one—is often the difference between a student clicking through a slide deck and a student truly engaging with the material.
References
Gunawardena, C. N., & Zittle, F. J. (1997). Social presence as a predictor of satisfaction within a computer‐mediated conferencing environment. American Journal of Distance Education, 11(3), 8–26. https://doi.org/10.1080/08923649709526970
Mayer, R. E. (2014). Principles based on social cues in multimedia learning: Personalization, voice, image, and embodiment principles. In R. E. Mayer (Ed.), The Cambridge Handbook of Multimedia Learning (pp. 345–368). Cambridge University Press. https://doi.org/10.1017/CBO9781139547369.017
Mayer, R. E., & DaPra, C. S. (2012). An embodiment effect in computer-based learning with animated agents.Journal of Experimental Psychology: Applied, 18(3), 239–252. https://doi.org/10.1037/a0028616
Richardson, J. C., & Swan, K. (2003). Examining social presence in online courses in relation to students’ perceived learning and satisfaction. Online Learning, 7(1). https://doi.org/10.24059/olj.v7i1.1864
Koichi Sato is a learning designer at the University of South Florida.
The post From Faceless Slides to Personal Connection: A Rapid AI Avatar Workflow for Busy Faculty appeared first on The Teaching Professor.